
To fully utilize the capabilities of your reporting sandbox, there are a couple tools in XAMPP that you will need to utilize, FileZilla and MySQL.
First up is the FileZilla server. FileZilla is a GPL-licensed FTP server. If that last sentence was utter gibberish, this will allow you to write pages and scripts on your main PC and easily transfer them to your sandbox machine.
Setting up FileZilla is easy. Go to your sandbox machine and open the XAMPP control panel. If you haven’t already, install FileZilla as a service and start it. Then hit the Admin button for it, and the management GUI will open. Go to Edit –> Users and you’ll see a window like so:
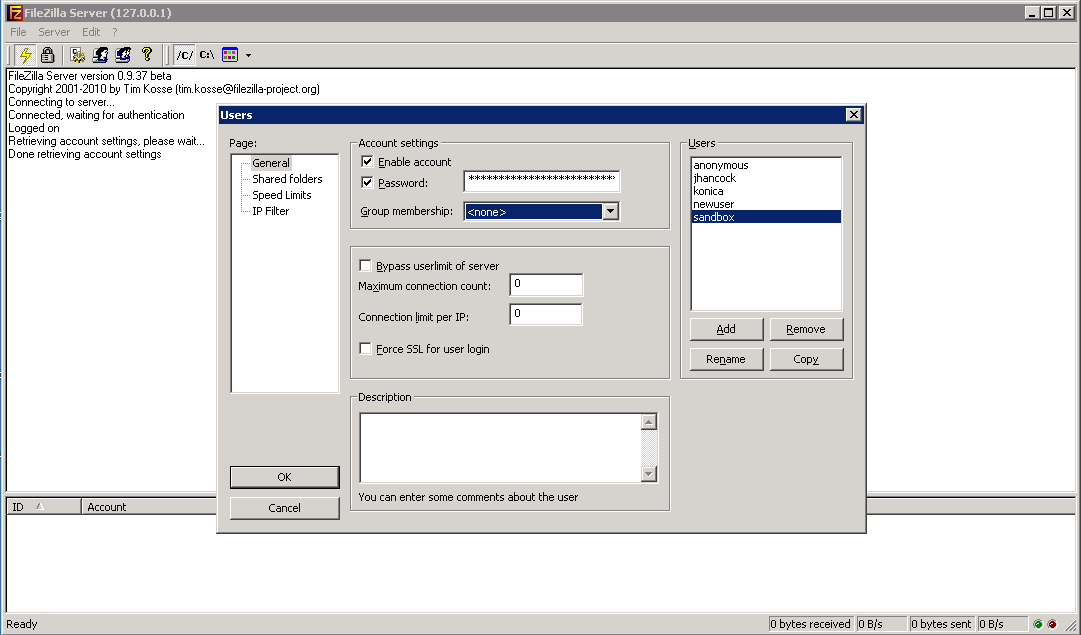
Depending on which version of FileZilla you’re running, you might have a default ‘anonymous’ user. Strictly speaking, as long as you have FileZilla running, you could just use the ‘anonymous’ account. However, we’ll do this right and have a bit of security on the system (or set up the only user, on new versions.) First, uncheck enable account for the ‘anonymous’ user. Next, Add a user, ‘sandbox’, perhaps. Set a password and be sure the account is enabled. On the left pane in Users, go to ‘Shared folders’. Click your ‘sandbox’ user, and Add a shared folder. This folder will be, if you used my default recommendation, C:\xampp\htdocs. ‘htdocs’ in XAMPP is where your webpages will go, or your root directory. Just to the right of that, check all the boxes under Files and Directories, and below that, click the Set as home dir. That’s all there is to it.
Should you later decide grant others access to the reporting setup, this is the place to start. Notice that you can create accounts with restricted access. If, for example, you wanted to allow someone to modify your reports, you could restrict write access to the server if you wanted to be sure they don’t overwrite any critical files. Or simply disallow delete functionality so you don’t have files unexpectedly disappear. As far as user accounts go, I’m an advocate of everyone having their own. Systems like this need accountability, and so every user on the system should correlate to a single human being.
Next up, download the FileZilla client on your main PC (and any other you’ll access the sandbox from) from https://filezilla-project.org/download.php?type=client and install it. Open Site Manager and you’ll see a window like this:
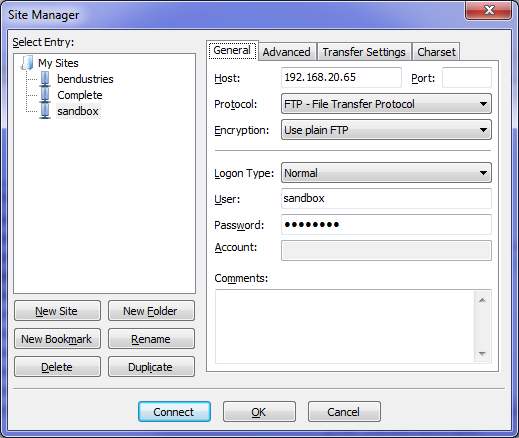
Hit the New Site button and set the Host to the IP address you assigned to your sandbox. Leave Port blank. The Logon Type is Normal, and User and Password are, of course, those of the user you just set up in the FileZilla server. Optionally, go to the Advanced tab and set the Default local directory to the directory where you save your pages and scripts. Hit Connect to see that everything is working all right and you’re all set.
Next, we’ll get MySQL set up. While you may not need it, I’ll shortly be doing an article on a report that utilizes it, and so I may as well cover setting it up.
This can all be done through a browser from your main PC, thankfully. First, go to your sandbox’s IP in a browser, which will take you to the main page for XAMPP. Under Tools on the left sidebar, click PHPMyAdmin. This takes you to a graphical interface for managing MySQL. in the row of buttons across the top of the interface, go to Users (or Privileges in older versions.) Notice there are two ‘root’ users, one for host ‘127.0.0.1’ (or ‘linux’) and one for localhost. Edit both, and set the same password on both. That’s all you really need to do. If you’re so inclined, create another user with full functionality and use that account for your scripts. Either way, just be sure to note what user and password you choose, as you’ll need these to access the MySQL tables from your scripts. Additionally, like FileZilla, you can create users with restricted privileges to keep them from making stupid mistakes.
If you attempt to start the MySQL service and it fails with a ‘Error 1067’ message, odds are good it’s the result not actually installing MySQL as you would a normal application. To remedy this, go to the \xampp\mysql\bin folder and find the ‘my.ini’ file. This is the default configuration file MySQL uses. In the [client] section, add the drive letter and a colon to the front of the string, so it looks like “C:/xampp/mysql/mysql.sock” in the ‘socket’ key. Do the same in the [mysqld] section to the following keys: ‘socket’, ‘basedir’, ‘tmpdir’, ‘datadir’. From there, the service should start right up.
Here I’ve shown you the basic setup for FileZilla and MySQL, at least enough to get you started. I could go into deeper detail, but these are subjects which have been covered by people far more qualified to speak to them than I. But, should you need my help, I remain 
Recent Comments