
In my previous post, I showed you an item bin report. This allows you to see what bin an item resides in in your warehouse without having to wade into the Item History screen (or keeping unauthorized employees from needing to ask employees that have access to these screens).
What I presented there was actually a modification of a report my people use literally every day. On the advice of Ken Sladovnik from ECI2, we put around half our stock into bulk bins. These are items that don’t get packaged for shipment. The boys in the warehouse slap a label on them and send them out as-is. These items include cartons of paper, laser toners, paper towels and toilet paper, and a handful of other items.
If you want the shortcut version, this file is available here: http://bendustries.co/files/warehouse/itembin-bulk.zip. Otherwise, read on to see how to modify the existing itembin.php file to work with bulk bins.
The system works well for us, with some small downsides: bulk bins exist only in text. The access I allow to text typically is very restricted. Without heavily locking text down, it can be incredibly dangerous to allow employees access to it at all. Offhand, I’d say less than 10% of the employees in my company have a stand-alone text login. Even fewer know the ‘?’ trick to get in through graphical.
Worse for our purposes here, bulk bins are not synced in SQL. This is one of very, very few tables not available in SQL, from what I’ve seen. My hope is that it isn’t a sign of impending deprecation, but rather a low priority, as from what I’ve heard, not many companies are using bulk bins, which is likely a chicken and egg problem – who’s going to use them if they aren’t available in graphical? Since so few use them, there’s little motivation to port to graphical.
But, I needed a way around it, as the bulk bin side was more important overall than the static side. Knowing MS Excel can open DDMS’ .dbf tables like a normal spreadsheet, the answer wasn’t far off. First, I needed a MySQL table to hold the bulk bin data. The SQL commands for that are small and straightforward:
CREATE TABLE IF NOT EXISTS `bulk_bin` (

  `seq` int(11) NOT NULL AUTO_INCREMENT,

  `item_key` varchar(23) NOT NULL,

  `loc` int(1) NOT NULL,

  `bin` varchar(4) NOT NULL,

  `bulk_unit` varchar(2) NOT NULL,

  `bulk_qty` int(11) NOT NULL,

  PRIMARY KEY (`seq`)

) ENGINE=MyISAM DEFAULT CHARSET=utf8 AUTO_INCREMENT=1 ;
Or, download and import in PHPMyAdmin this file: http://www.bendustries.co/files/warehouse/bulk_bin.sql.gz and it will create the table structure for you. If you downloaded the bendustries_xampp package, this table already exists.
Next, to get your bulk bin items into that table, navigate into your DDMS directory on the server and find the ‘in’ directory. In a typical DDMS installation, all inventory files are located on the ‘in’ volume, in DDMS parlance. Open i-bulk.dbf with Excel – I prefer to actually be in the EK (bulk bin) screen when I do this so as to lock the file. Excel will warn you that the file is locked for editing and give the option of opening a read-only copy. Do that, as Excel will take a copy of that table, which will be what you’ll be working with. It would be a Bad Thing to have Excel tying up one of your .dbf tables, on the off-chance something goes wrong. Don’t sweat it too much, though – I’ve done this same thing a hundred times and have never had a problem.
When you open up the file in Excel, it will looks something like this:
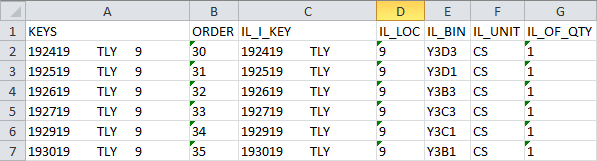
The table goes out wider than this, out to column X, but what we care about is all grouped together here. The columns we want are C through G. The IL_I_KEY field is our item_key field in MySQL, which will serve as the column lookups are performed against. IL_Loc you don’t necessarily care about (assuming you maintain inventory in a single location), but easier to pull it in so you don’t need to mess with creating the table for the update too much. IL_BIN is, of course, the critical part here. IL_UNIT and IL_OF_QTY are the ‘bulk conversion’ fields – if I sell paper by the ream, I can stock it in both bulk and non-bulk locations and with the proper picking configuration, DDMS will split an order of 6 reams of 20# 11×17 paper onto separate picks – a full case in bulk, and a single ream from the P.Bin. These fields control that logic (and, incidentally, bulk bins won’t work correctly without them).
So, simply start on row 2, and grab columns C through G. Ctrl+Shift+Down to go to the end of the table and copy. Open a new document and paste as values. Don’t bother with column headers – we’ll specify what goes where in PHPMyAdmin. Save this file as ‘bulk_bin.csv’ or the like (remember to switch the file type so it doesn’t accidentally save as ‘bulk_bin.csv.xlsx’).
With your bulk bins file created, go to PHPMyAdmin and click through to your bulk_bin table. Go to the Import tab and browse to the file. In newer versions of PHPMyAdmin, you’ll need to specify that it is a csv file and set the options in the csv section of the page. Really, all you need to specify are the column names – since we have the ‘seq’ column, we have to tell PHPMyAdmin where the data goes.
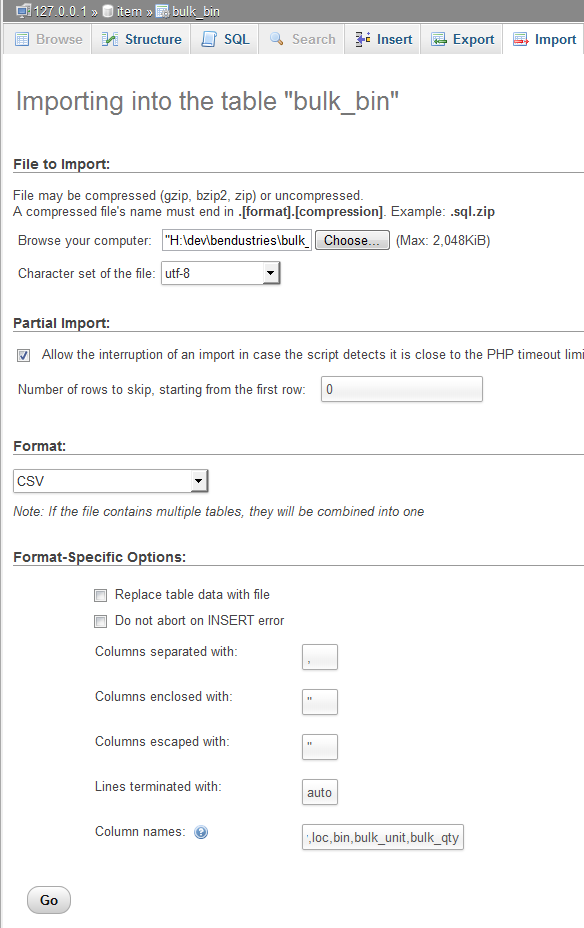
Click image for full size
Once imported, you’re ready to modify or recreate your itembulkbin.php file. We’re going to add a query to our MySQL database to retrieve the bulk bin based on the item key in that table. We’ll use a bit of PHP trickery to create that key from the item number. First things first, add three more rows to the column headers at the end of that block, like so:
Then add mysqli_select_db($connect, 'item'); immediately below that section. This switches MySQL to our item table (we’ve already connected to the MySQL server itself earlier in the script). Right below that, add the following lines:
$queryString = "SELECT bin, bulk_unit, bulk_qty FROM bulk_bin WHERE '$key' = item_key and loc = '9'";

	$Qry = mysqli_query($connect, $queryString);

	$qryRes = mysqli_fetch_array($Qry);
Note that as before, you’ll likely need to change the ‘loc’ parameter (or delete it entirely).
Where we return the results, there are, as you might have guessed, three lines to be added there, as well:
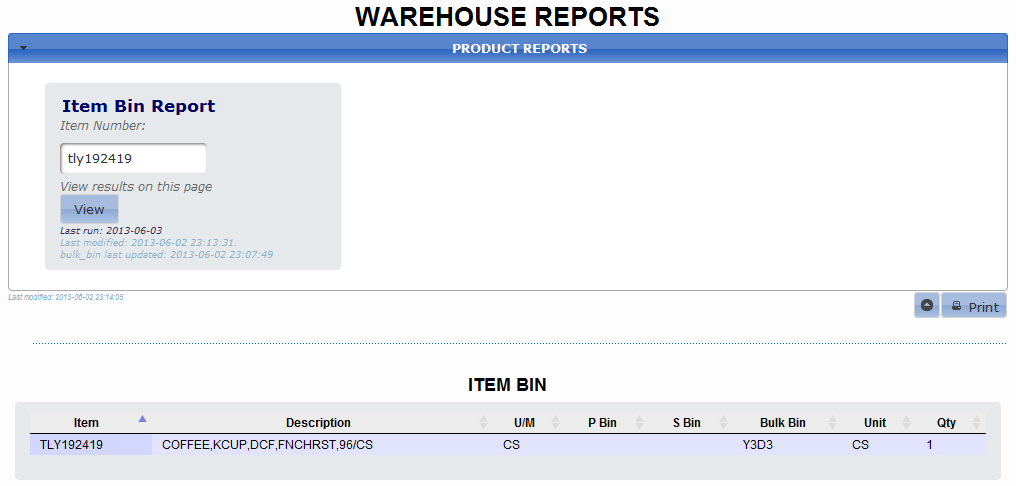
That’s pretty well all there is to it. Upload that to your sandbox still as bulkbin.php and search for something you keep in bulk (and one very nice thing is we don’t have to reload the page for this to work):
Click for full size
What I’ve covered today is, to my mind, one of the better ways to get to item bins. I use it myself all the time if I don’t happen to have a text screen open, as I keep my reports page open all the time and I don’t necessarily have Item open in Graphical. It’s also a powerful message to your people that they’re not being given a lesser solution – it isn’t that they aren’t allowed to get to those screens, it’s that there is a faster, cleaner way to see what they need.
As always, if you need my help, I am 
Recent Comments